Configure Cloudflare on Zephyr
Originally launched as an email spam tracker, Cloudflare today offers extensive capabilities for users to register, manage domains as a registrar, and monitor, secure, and configure an entire IT infrastructure.
In this guide, we'll walk you through configuring Cloudflare as your default cloud provider for deploying and versioning applications with Zephyr Cloud. This setup leverages Cloudflare's global edge network, KV namespaces, Workers, and Pages to deliver your content at the edge.
Prerequisites
- A registered Cloudflare account
- A domain registered on Cloudflare, or a domain whose DNS can be managed by Cloudflare
- A registered Zephyr Account
SSR Worker (beta)
Zephyr’s SSR Worker runtime is currently beta and only available on Cloudflare using Zephyr’s default (managed) Cloudflare integration.
It is not available on Bring Your Own Cloud (BYOC) deployments (including custom/non-default integrations).
If you need SSR support on another integration or deployment target, send us a DM on Discord.
Learn more: SSR Worker (beta).
Using TanStack Start? See: TanStack Start.
Configure and Enable Cloudflare
Log in to the Zephyr Dashboard
After signing in, select your organization.
Locate Cloudflare under Deployment Integration
- Select Settings from the top navigation tabs.
- On the left sidebar, select Deployment Integration.
- Choose Available to find Cloudflare, then click on Add integration.
Configure Your DNS Record
- Return to your domain’s home page (the Overview page should still be open) and click on DNS on the left sidebar.
- Click Add record on the Records page and enter the following details:

Click to view DNS record details
Connect with Cloudflare (recommended)
Zephyr Cloud now supports Cloudflare OAuth for deployment integrations. This is the recommended setup path because you authorize Zephyr in Cloudflare instead of manually copying a Cloudflare API token and Zone ID into Zephyr.
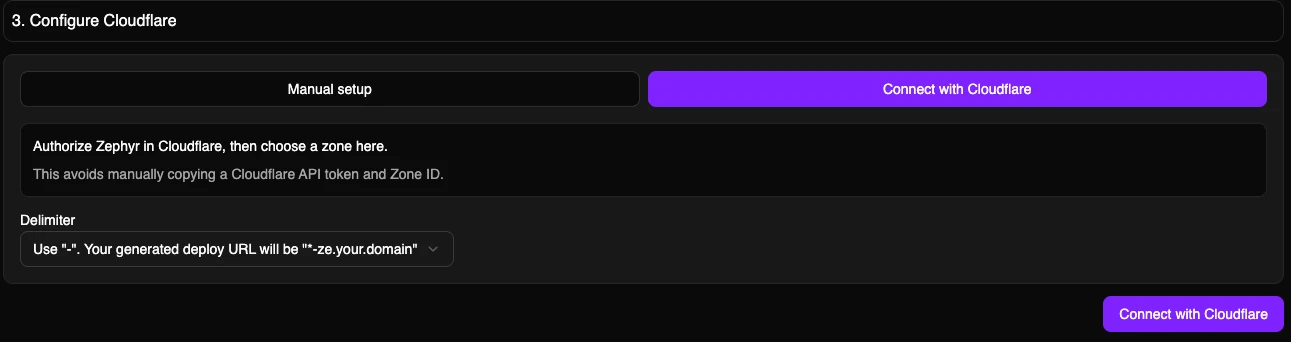
After completing Basic Info and confirming the DNS record:
- In Configure Cloudflare, choose Connect with Cloudflare.
- Click Connect with Cloudflare.
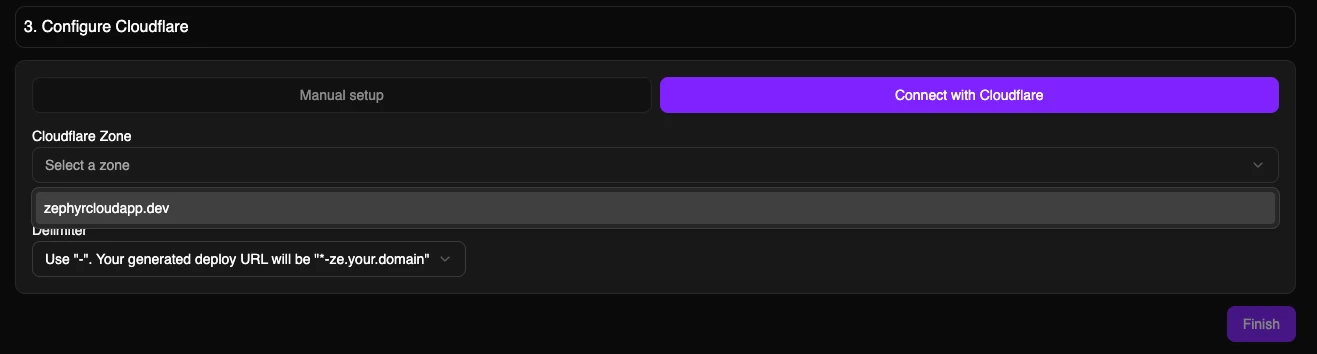
- In Cloudflare, select the Cloudflare account that owns the zone you want Zephyr to use.
- Review the requested permissions, then select Authorize.
- After Cloudflare redirects back to Zephyr, wait for Zephyr to load your Cloudflare zones.
- Select the Cloudflare Zone for this integration.
- Choose the delimiter for generated deployment URLs.
- Click Finish.
Cloudflare shows the application name, publisher domain, account selection, and requested permissions before you authorize. Zephyr completes the OAuth exchange server-side, so Cloudflare access and refresh tokens are not exposed in your browser.
You can review or revoke authorized OAuth applications from your Cloudflare profile. Cloudflare account administrators can also restrict public OAuth application access for their account. See Cloudflare's Authorizing an application guide for details.
Manual API token setup
Manual setup remains available if OAuth is unavailable for your account, blocked by your Cloudflare account settings, or your organization requires manually managed Cloudflare API tokens.
For manual setup, you will need your Cloudflare Zone ID and an API Token.
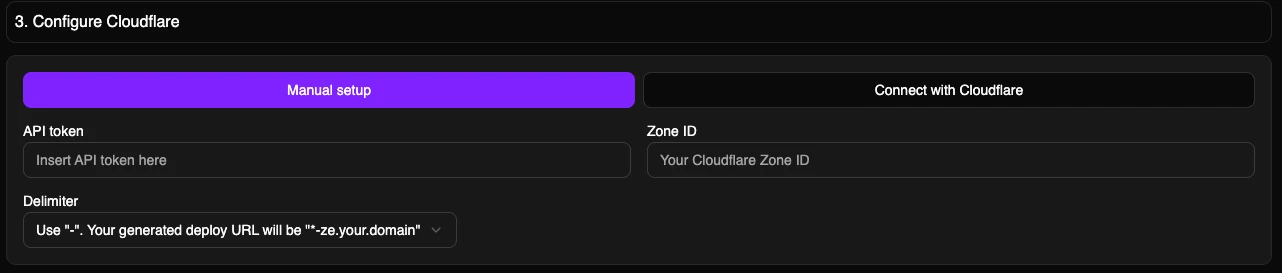
1. Zone ID
- On your domain’s Overview tab, scroll down to the API section on the right sidebar.
- Find the Zone ID in this section.
2. API Token
- Near Zone ID and Account ID, right-click on Get your API token to open it in a new tab.
- Scroll to the bottom and select Create Custom Token by clicking on "Get started."
- Give your API token a meaningful name (e.g., the purpose or creator).
- Configure the required Permissions:
3. Zone Resources: When prompted, include a Specific zone under your domain
- Leave other configurations (e.g., Account resources, Client IP Address Filtering) as defaults.
- Scroll to the bottom and select Continue to summary to review your configurations, then Create Token. The token will display on the next page.
4. Configure advanced certificate (optional: required if you want to use domains like *.ze.your.domain)
- Go to SSL/TLS page and view Edge Certificates
- Click on Purchase ACM and complete buying
- Order/configure advanced certificate and add
*.ze.your.domaininto Certificate Hostnames, so complete list should look likeyour.domain *.your.domain *.ze.your.domain
Configuration Inputs
Details for each input after clicking Add Integration under Cloudflare:
Choose Connect with Cloudflare for OAuth setup, or Manual setup to paste a Cloudflare API token and Zone ID.
Choose the delimiter for application subdomains: - (your deploy URL will be
*-ze.your.domain) or . (your deploy URL will be *.ze.your.domain)
Required only for Manual setup. Obtainable from Cloudflare. See instructions for creating your API token.
Required only for Manual setup. In OAuth setup, Zephyr lists the zones available to the Cloudflare account you authorized.
This operation is idempotent and will create a Cloudflare Pages project. This field will become the name of your Cloudflare Pages project.
When set as default, all Zephyr deployments will use this integration until a new one (default integration) is set.
Testing Cloudflare Integration
Visit our recipes to test an application. Your next deployment should use your designated domain! (If not, talk to us on Discord).
When using our managed cloud (Cloudflare) or custom Cloudflare integration, avoid including capital letters in names for package.json, module federation configuration, or assets to prevent issues with Cloudflare queries.
Troubleshooting
Cloudflare OAuth setup
Cloudflare authorization was not completed
If Zephyr says Cloudflare authorization was not completed, reconnect and try again. Confirm the browser completed the Cloudflare authorization flow and was not blocked by a popup, extension, or account access restriction.
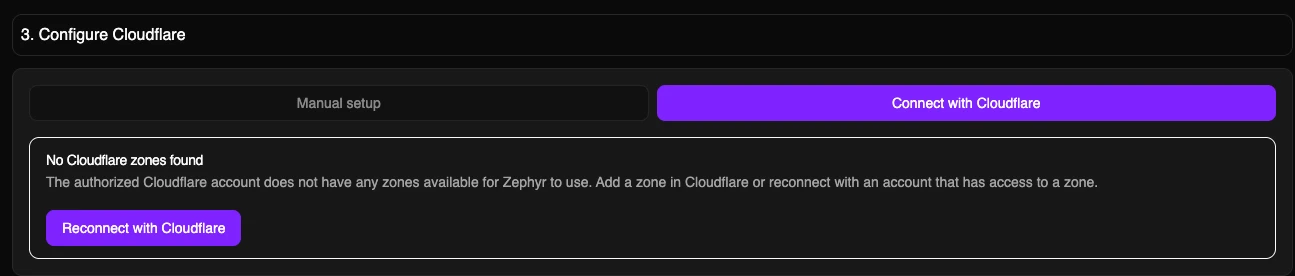
No Cloudflare zones found
If Zephyr cannot find any Cloudflare zones after authorization, the Cloudflare account you selected may not have access to a zone. Add a zone in Cloudflare, ask an account administrator for access, or reconnect with a different Cloudflare account.
Zones keep loading or OAuth is temporarily unavailable
Reconnect with Cloudflare and try again. If OAuth remains unavailable, you can use Manual setup as a fallback or contact us on Discord.
Revoke Zephyr access in Cloudflare
You can revoke Zephyr's Cloudflare OAuth authorization from your Cloudflare profile's OAuth authorization management page. After revoking access, remove the affected deployment integration in Zephyr or reconnect it with Cloudflare.
What Will Be Created on Your Cloudflare Account?
When Cloudflare is added as your provider on Zephyr, these properties will be created on your Cloudflare account:
1. KV Namespaces
Three namespaces will be added:
- ze_snapshots
- ze_files
- ze_env
2. Workers
ze-worker-for-static-upload(for uploading and serving assets)
3. Worker Routes
ze.<domain.com>/*on workerze-worker-for-static-upload*-ze.<domain.com>/*on workerze-worker-for-static-upload
4. DNS Records
A CNAME record will be added to your domain with the following details:
Deployment and Inspecting Assets
Once your first Cloudflare deployment is complete, you can inspect assets.
In your Cloudflare dashboard, navigate to Workers & Pages and then KV to view assets under ze_files.
ze_files: stores your actual assets.ze_envs: stores application environment and access rights.ze_snapshot: stores application snapshots compared against the previous build.- If deploying an application previously on our managed cloud, run
rm -rf ~/.zephyrbefore deployment. - If you encounter issues deploying Micro-frontend applications, see our Micro-frontend deployment guide.
Clean Uninstall and Reset
- Zephyr Cloud does not manage deletion of API tokens or any Cloudflare account properties.
- For OAuth-created integrations, revoke Zephyr from Cloudflare if you also want to remove the Cloudflare-side authorization.
- Assets and information on your Cloudflare account are immutable by default. During a clean uninstall, previously deployed assets and information are unrecoverable.
To delete an existing Cloudflare integration, follow these steps:
Delete Workers & Pages Projects
-
Sign in to Cloudflare. In the navigation bar, select Workers & Pages.
-
Click on ze-worker-for-static-upload, select Manage, then click Delete.
-
Return to Workers & Pages and locate these two properties:
- Cloudflare integration name: created under Cloudflare Project Name on the Zephyr dashboard.
- ze-worker-for-static-upload: created by Zephyr when integration was added.
Select both projects, choose Manage, and click Delete.
Delete KV Namespace
-
In Workers & Pages, select KV.
-
Locate and delete the following namespaces:
- ze_envs
- ze_snapshots
- ze_files
Delete Worker Routes
-
On the dashboard, select the domain used for Deployment integration.
-
Choose Workers Routes in the navigation bar. Locate routes with
zeand*-zeprefixes, then select Edit and Remove.
Delete Deployment Integration
-
Log into Zephyr, select the organization with the integration to delete.
-
Go to Settings in the organization dashboard, choose Deployment Integration.
-
Select the integration name and click Remove.
What’s Next?
Add Environments
Configure custom domain for your application with your deployment integration platform.