This detects your bundler and configures Zephyr automatically. Learn more →
For manual setup, continue below.
In this section, we will guide you through the process of starting a new React Native application powered by Module Federation. The app will include a simple host application and a remote application.
Open the rspack.config.mjs file in HostApp and modify the build configuration to include the following:
HostApp/rspack.config.mjs{4,15,68}
import path from 'node:path';import { fileURLToPath } from 'node:url';import * as Repack from '@callstack/repack';import { withZephyr } from 'zephyr-repack-plugin';const __filename = fileURLToPath(import.meta.url);const __dirname = path.dirname(__filename);/** * Rspack configuration enhanced with Re.Pack defaults for React Native. * * Learn about Rspack configuration: https://rspack.dev/config/ * Learn about Re.Pack configuration: https://re-pack.dev/docs/guides/configuration */export default withZephyr()((env) => { const { platform, mode } = env; return { context: __dirname, entry: './index.js', resolve: { // 1. Understand the file path of ios and android file extensions // 2. Configure the output to be as close to Metro as possible ...Repack.getResolveOptions(), }, output: { // Unsure - for module federation HMR and runtime? uniqueName: 'react-native-host-app', }, module: { rules: [ ...Repack.getJsTransformRules(), ...Repack.getAssetTransformRules(), ], }, plugins: [ new Repack.RepackPlugin({ platform, }), new Repack.plugins.ModuleFederationPluginV2({ name: 'HostApp', filename: 'HostApp.container.js.bundle', dts: false, remotes: { MiniApp: `MiniApp@http://localhost:9001/${platform}/MiniApp.container.js.bundle`, }, shared: { react: { singleton: true, version: '19.0.0', eager: true, }, 'react-native': { singleton: true, version: '0.78.0', eager: true, }, }, }), // Supports for new architecture - Hermes can also use JS, it's not a requirement, it will still work the same but it's for performance optimization new Repack.plugins.HermesBytecodePlugin({ enabled: mode === 'production', test: /\.(js)?bundle$/, exclude: /index.bundle$/, }), ], };});
Take running the ios app as an example. Firstly we need to bundle the ios application and start the emulator:
pnpm --filter HostApp run ios
Platform inference
Passing in --platform ios or --platform android is recommended as it will start the dev server for the specific platform. Zephyr resolves MiniApps by platform inferred from the react-native start command.
If you opted to only run react-native start, you will be spawning two dev servers, one for iOS and one for Android, regardless whether the emulator is running iOS or Android.
Then we can run the dev server for both host and mini app. The same command will also deploy the application, you should deploy the MiniApp first
pnpm --filter MiniApp start --platform ios
Without Zephyr, running MiniApps within a React Native application require you to run the dev server for both host and mini app. But with Zephyr, you can run any application standalone.
The first time you initiate a build with Zephyr, it will prompt you to log in by directing you to the Zephyr website. This login is required only on your first build; subsequent builds will not require a login.
We may require you to log in again if you removed your Zephyr configuration file ~/.zephyr locally.
You should see the applicaiton running in the iOS emulator:
Behind zephyr-repack-plugin, we auto-handle the platform resolution. When you are building a React Native app, the plugin would recognise the platform and finding, resolving the correct dependencies for the platform. For example if you are building for iOS, the plugin would resolve the iOS dependencies and vice versa for Android. No additional configuration is required to resolve the platform.
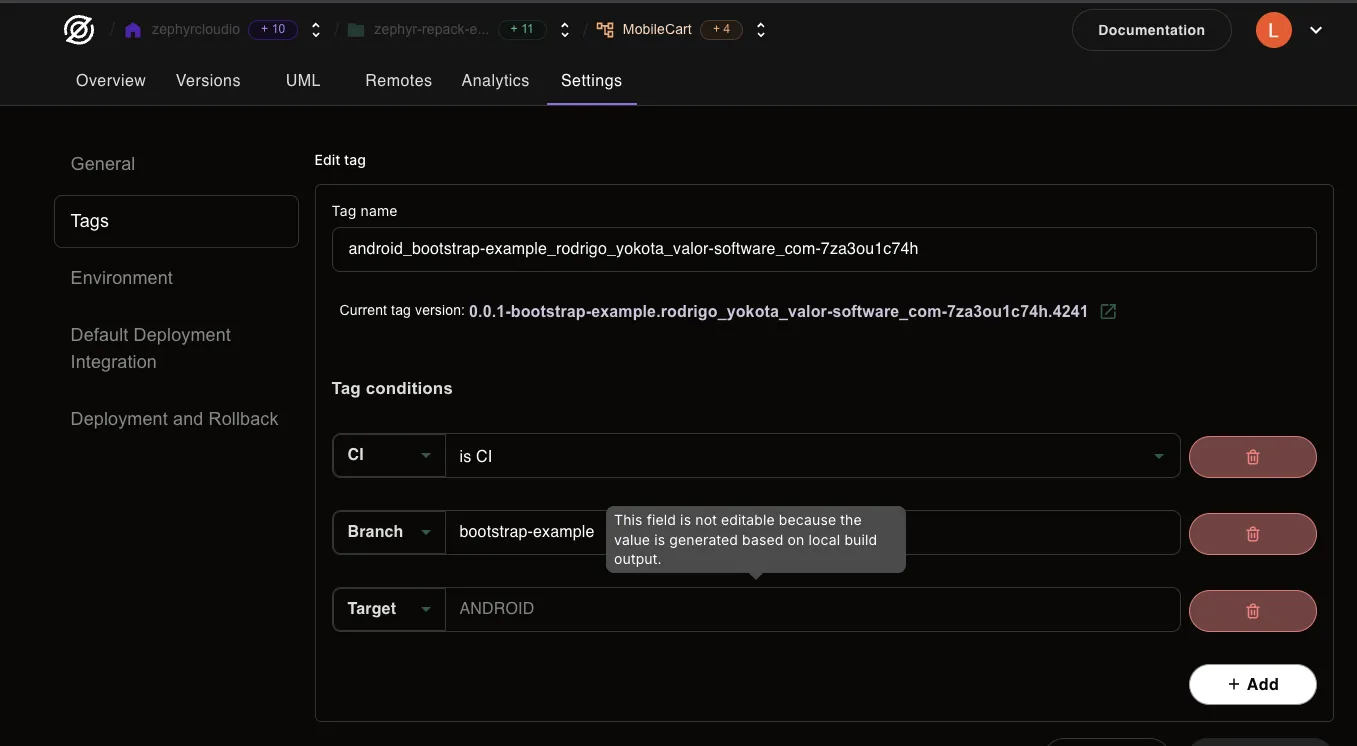
For each version that's built and deployed, you can find the platform on the Tag page of the application version, displayed as IOS or ANDROID next to Target field. The platform's name is also part of the tag name that's being created on each deployment.
Sharing dependencies in a federated mobile application differs slightly from a federated web application. It requires more effort due to the native aspects of React Native dependencies.
To make module federation work correctly in React Native applications, we need to configure the shared field in the Module Federation plugin from Re.Pack. The general rule is that react and react-native dependencies must be included in the list and marked as singletons. Marking them as singletons ensures that only one instance of such modules is ever initialized, which is a strict requirement for React and React Native.
If the dependencies are specified in the host app (or a mini application running in isolation), they should also include the eager flag. The eager flag ensures that the module is initialized at the start of the app.
The same rule applies to all dependencies that include native code. For example, if any mini-app uses a library with native code (such as react-native-reanimated or react-native-mmkv), it should be added as a singleton and eager-shared dependency in the host app, and as a singleton dependency in the mini-app that uses it.
For shared JavaScript-only dependencies, it's not necessary to mark them as shared, as Re.Pack can handle downloading them from the mini-app. However, for better network efficiency, it is recommended to include them as shared dependencies.
All this effort requires significant maintenance of the dependencies list in rspack/webpack and package.json for each application. This process can be simplified by using Microsoft’s rnx-align-deps library with a custom preset and helper functions to generate the shared dependencies list.
Handling navigation in a React Native federated application differs slightly from web apps, as it does not rely solely on a links-based routing system and the browser's history API. Instead, it incorporates native navigation concepts such as UINavigationController on iOS and Fragment on Android.
This has a few implications:
Every navigator needs to be wrapped in a NavigationContainer.
It is not possible to navigate directly from one NavigationContainer to another.
Considering best practices for mini application development, one recommended approach is to use multiple NavigationContainer instances: one for the host application and one for each mini application. This allows each mini application to maintain independent navigation states and linking setups (e.g., with unique prefixes). Navigation between mini applications would then rely solely on methods exposed by the host. This approach minimizes the coupling of mini applications by enabling communication between them exclusively through the host application.
However, sometimes we opted for a centralized solution, letting the host manage the navigation using a single NavigationContainer with the navigation structure defined within it. This approach made sense in our case, as some of our mini applications contained only a single isolated screen. It offered several advantages, including:
A unified source of navigation truth.
Simplified linking setup.
Compatibility with all navigation scenarios.
Adherence to best navigation practices, such as avoiding nested stack navigators and maintaining type safety.
On the downside, this approach increased coupling, which resulted in challenges for standalone development and required host app updates for any navigation changes within the application.
There is also a third solution: using a single NavigationContainer in the host application while exposing navigators from the mini applications. This approach reduces coupling, allowing mini applications to maintain control over their navigators. However, it can lead to undesirable navigation structures, such as deeply nested stack navigators, and a complex linking setup that requires synchronization between the host and mini applications.
#Running the application in release mode with Zephyr
When you are using Zephyr with Re.Pack, the HostApp auto-loads MiniApps' bundles from Zephyr. To run the app in production/release mode with Zephyr, the process involves configuring your Zephyr environment - and zephyr-repack-plugin will auto-retrieving the latest deployed remote URLs as well as updating the HostApp’s module federation configuration during the bundling. Once completed, you can build and launch the app in release mode normally (e.g. via Xcode or react-native release build), and it will load MiniApps from the Zephyr Cloud URLs instead of localhost.
We will soon launch react-native-zephyr-sdk to auto-rollback, roll-forward MiniApps during runtime. To use react-native-zephyr-sdk, you must use zephyr-repack-plugin during build time.
Bundle HostApp and MiniApps, and deploy to Zephyr Cloud:
Bundle the MiniApp:
## bundle towards iosZC=1 pnpm --filter MiniApp bundle:ios## bundle towards androidZC=1 pnpm --filter MiniApp bundle:android
Bundle the HostApp:
## bundle towards iosZC=1 pnpm --filter HostApp bundle:ios## bundle towards androidZC=1 pnpm --filter HostApp bundle:android
Command run with ZC=1 will deploy the bundles to Zephyr Cloud.
Build and run the HostApp in release mode:
For Android, you can use the following command from the HostApp android directory:
ZC=1 ./gradlew assembleRelease
The HostApp will now load each MiniApp's bundle from the specified Zephyr Cloud URLs instead of localhost. Verify that the app launches correctly and that each MiniApp is fetched successfully from the remote URL.
By following these steps, you can run your HostApp in production mode with Zephyr, using the remote bundles (MiniApps) deployed on Zephyr Cloud.